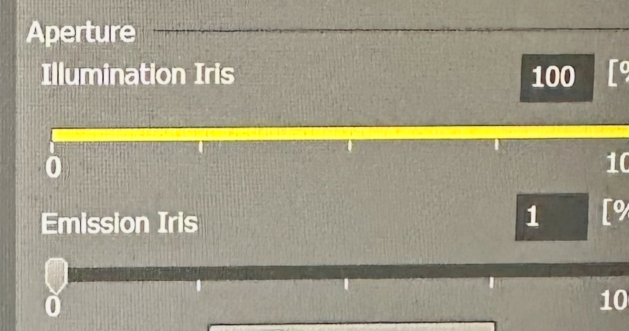
Check that the Aperture Illumination Iris and the Emission Iris are set to 100% and >95% respectively. This setting is located at the bottom right of the Spinning Disk OC menu. Shown here set incorrectly; move the slider to 95% or greater.
Crest spinning disk on Nikon Ti2 stand
CrestOptics X-LIGHT V3 CONFOCAL UNIT SN V32206186P
X-LIGHT V3 Spinning Disk Unit S/N V30006186P
CELESTA Light Engine S/N 28444
A spinning disk confocal expecially useful for high resolution live imaging, wide field of view tiling, and cleared tissues too big for laser scanning confocal and too small for lightsheet. This microscope replaces the Nikon Ti for CFP/YFP ratio FRET.
The microscope may also be used for widefield imaging including transmitted light imaging at speeds up to 500 frames per second.
All samples for this microscope require a #1.5 coverslip. Read more here.
Specifications
LEDs for widefield fluorescence: 385, 475, 550, 621 nm.
Excitation filters for widefield: multipass standard blue/green/red/near-IR, CFP/YFP.
Lasers for confocal: 405, 440, 488, 514, 561, 640, 730 nm.
Emission filters: 438/24, 485/20, 511/20, 595/31, 685/40, 794/32, 484/561 CFP/YFP FRET, multipass 440/521/607/694/809 nm.
70 um pinholes (optimized for 20X lens).
Perfect Focus System, IR laser based.
Lenses
Make sure you use the correct immersion media. Using the wrong oil will give bad images.
10X Plan Fluor Ph1 DLL -- Warning: Not chromatically corrected! Not for confocal.
20X 0.80 AIR Plan Apo λD DIC
40X 1.25 SILICONE OIL
60X 1.40 OIL Plan Apo λS Ph3 Why Phase Contrast?
100X 1.49 OIL Apo TIRF DIC
100X 1.35 SILICONE OIL (as of 20240307 by request, ask staff to install on microscope)
Camera and Field Of View
The Kinetix camera is very low noise. You may find that setting the maximum intensity at 6000 in 16 bits mode is more than enough signal. The camera has a very large field of view and a few modes. Most people will use it in the 16 bits mode. However, understanding the different modes is important if you want to approach single molecule type sensitivity or drive the camera fast, such as 500 frames per second. More details here.
The largest image is 2720 X 2720 pixels. With the 40X lens, this covers 442 X 442 um. At 100X, the FOV is 177 X 177 um. Of course, you may choose a smaller FOV. Read more here.
Tokai Hit environmental chamber
Chamber has inserts for slides and 35 mm dishes. All chambers must have #1.5 coverglass bottoms. Polycarbonate works for imaging but does not work with autofocus system.
Heated collar for immersion lenses.
A few rules
The single worst thing you can do is spill any liquid on the scope. If there is a spill of any liquid, IMMEDIATELY clean it up. The first priority is anything that spills near the objective lenses. Then immediately follow this by contacting staff. Do not continue your experiment. Addressing any potential damage takes precedence over any experiments.
For work with dishes, we advise putting a few crumpled Kimwipes or low dust cloth around the lenses.
Do not touch any of the knobs, keyboard, mouse with gloves on. There's really no reason to wear gloves.
All parts must be kept in their correct locations. For instance, all Tokai Hit parts must be returned to the plastic drawer units where they are stored.
Never touch the camera or any part of the confocal unit except for the power switch. Do not put anything on top of this unit.
Oil always placed in dishes. NEVER put oil bottle down on any other surface.
If you get oil on the side of the bottle or lid, immediately clean all of it off. The next person who touches the oil bottle should not get oil on their fingers.
Use the correct immersion medium with the correct lens. There are three types of immersion media:
1. Water, Genteal, or other water substitute.
2. Silicone oil for 40X and 100X silicone lenses only.
3. Oil (typically Cargill Labs LDF) for 60X and 100X TIRF lenses only.
If you think the tip of the wand touched the wrong oil on the top of a lens, DO NOT put it back in the bottle. This would contaminate the entire bottle. Contact staff.
If you think you got immersion oil on the 20X air lens, immediately stop what you are doing and contact staff.
Data Storage:
All data must be stored on drives D:, E:, F:.
If you store data on drive C: or on the desktop, you may lose access to the scope.
If you plug a USB device in that has not been MCIT anti-virus scanned and vetted by core staff in advance, you also may lose access to the scope.
Drive D: must be empty at the end of your session. It is a solid state drive for highest speed imaging. You may collect data here but need to copy them to E:, F:, or a server at the send of your session.
Files should be copied or moved to the server before the end of every session. Official policy is that data may not be left on E: or F:, but for practial purposes, this is tolerated until disk space drops below 1 TB. When disk space drops below 1 TB, files will be deleted oldest to most recent. There will be no warnings. Each user is responsible for their data.
Plugging in a USB device is forbidden. All data transfer must be done by network or by USB device vetted by MCIT or core staff.
Startup
Shutdown Note this is different than turning on. Do not touch individual component power switches.
How to take a multi channel image
Each OC (Optical Configuration) button in the upper right panel has hardware components assigned to it. For instance, the GFP button will have a 488 nm LED or laser, a narrow green filter, camera binning, sensitivity type, binning, an exposure time, and other properties assigned.
These need to be set the same in all OCs in a dataset:
In general, the camera should be set to 16 bits (Dynamic Range).
For highest spatial resolution, set the camera to No Binning.
The field of view is based on whether you have a small feature at the center of the field or a large area you want to image. For a field of cultured cells, 2048 x 2048 may be good to see a lot of cells.
For each OC, you may change the intensity of light and the exposure time.
You only need the peak intensity at 6000 for an excellent low noise wide dynamic range. For some applications, peak counts as low as 500 may be sufficient. If your peak counts exceed 40000, the image is too bright.
Use the capture button to collect a preview image of the current OC settings which will minimally exposure the sample to light.
Use Live (green triangle) to move around and focus, but this will expose the sample to light.
You can also duplicate an OC by right clicking on it and give is a name like "GFP preview" and set the binning to 2 or 4 and greatly reduce the light intensity and exposure time to make finding what you want to image faster and gentler on the sample.
To take pictures
In most layouts, the ND Acquisition window is in the lower left.
Click the box to save the images.
Set a path and filename. As you take images, a number will be added to the end of the filename. Therefore, if the filename you assign ends in a number, add an underscore or hyphen.
The λ (lambda) tab is where you assign the OCs, or channels, to be imaged. Check the box at the top of the tab to enable this. Fill the table with the channels you want to image. The check box at the left of each one enables them or disables them when you Run Experiment.
If you want a single image, make sure all the other tabs are unchecked.
Click the Run button in the lower right of this window and each OC will be imaged, they will be merged, and saved. Make sure the format is set to nd2.
Advanced: You may want to set focus offets from a reference color. For instance, with the 60X lense, use the green channel as the reference and set the far-red (excitation at 640 nm) to be 0.25 um to adjust for chromatic aberration. Or if you are focusing at the coverslip, maybe set the dapi channel 1.5 um to slice through the nucleus which isn't really at the coverslip level.
If you need a Z series, check the box in the Z tab and assign a range. Make sure the order of experiment is set correctly. For most applications, you will wan Z before lambda so that at each plane, all channels will be collected.
Make sure the tabs for Large Image and XY are not checked! Lleaving these checked is dangerous regarding crashing the lens.
Each OC may have a single command or macro assigned to do things like set the displayed contrast after an exposure.
Troubleshooting
Fluorescence signal very low with spinning disk imaging, but bright by eye or widefield imaging:
Check that the Aperture Illumination Iris and the Emission Iris are set to 100% and >95% respectively. This setting is located at the bottom right of the Spinning Disk OC menu. Shown here set incorrectly; move the slider to 95% or greater.
If condenser won’t lock in place, is too loose, or slips after focusing it, turn both knobs clockwise (if you were facing each knob, clockwise for each knob) until tight enough to stop slipping but not too tight to adjust height. This is standard on Nikon and Olympus scopes.